Roasting a turkey can feel like the ultimate culinary challenge, especially when the stakes are high for a holiday feast like Thanksgiving. The desire for that picture-perfect, golden-brown skin and incredibly moist, flavorful meat is universal, but achieving it consistently often feels shrouded in mystery. Fear not, home cooks of all experience levels! This comprehensive guide will demystify the process, providing you with a foolproof step-by-step approach to master how to cook turkey that’s both succulent and crispy, every single time.
Drawing inspiration from seasoned chefs and holiday survival guides, we’ll combine traditional wisdom with tested techniques to ensure your centerpiece bird is nothing short of spectacular. Forget the stress; embrace the joy of preparing a delicious holiday meal. We’ll cover everything from selecting your bird and crucial thawing methods to the secret behind that coveted crispy skin and how to guarantee juicy meat.
Setting the Stage: Choosing and Preparing Your Turkey
The journey to a perfect turkey begins long before it ever sees the oven. Making smart choices upfront will pave the way for a stress-free cooking experience and a delicious outcome.
How Much Turkey Do You Need?
A good rule of thumb is to allocate 1 to 1½ pounds of uncooked whole turkey per guest. If you love leftovers (and who doesn't?), or if you have particularly hearty eaters, leaning towards 1½ pounds per person is a wise choice. This ensures you have plenty for the main event and enough for creative post-holiday meals.
Thawing Your Turkey: A Critical First Step
If you’ve purchased a frozen turkey, proper thawing is non-negotiable. An improperly thawed turkey will cook unevenly, potentially leading to dry spots or, worse, undercooked areas. Always thaw your turkey in a cold environment to inhibit bacterial growth. The refrigerator method is by far the safest and most recommended:
- Refrigerator Thawing: This method requires patience but is the safest. Allow approximately 24 hours of thawing time for every 4-5 pounds of turkey. Place the frozen turkey, still in its original wrapper, on a rimmed baking sheet or in a large pan to catch any drips. A 16-pound turkey, for instance, would need about 3-4 days in the refrigerator.
- Cold Water Thawing (Emergency Method): If you’re short on time, this can be a viable option. Keep the turkey in its original waterproof packaging and submerge it in cold tap water. Change the water every 30 minutes to ensure it remains cold. Allow about 30 minutes per pound. A 16-pound turkey would take roughly 8 hours. Cook immediately after thawing.
Once thawed, ensure you remove the giblets and neck from both cavities. Pat the turkey thoroughly dry with paper towels — this crucial step contributes significantly to achieving that coveted crispy skin! For more detailed guidance on planning your holiday meal from start to finish, including comprehensive thawing advice, check out our Thanksgiving Turkey Guide: Planning, Thawing & Roasting Tips.
The Golden Rules for Juicy Meat and Crispy Skin
This is where the magic happens, transforming a simple bird into a show-stopping centerpiece. The secret to both incredibly moist meat and irresistibly crispy, golden skin often comes down to one key technique and a few strategic additions.
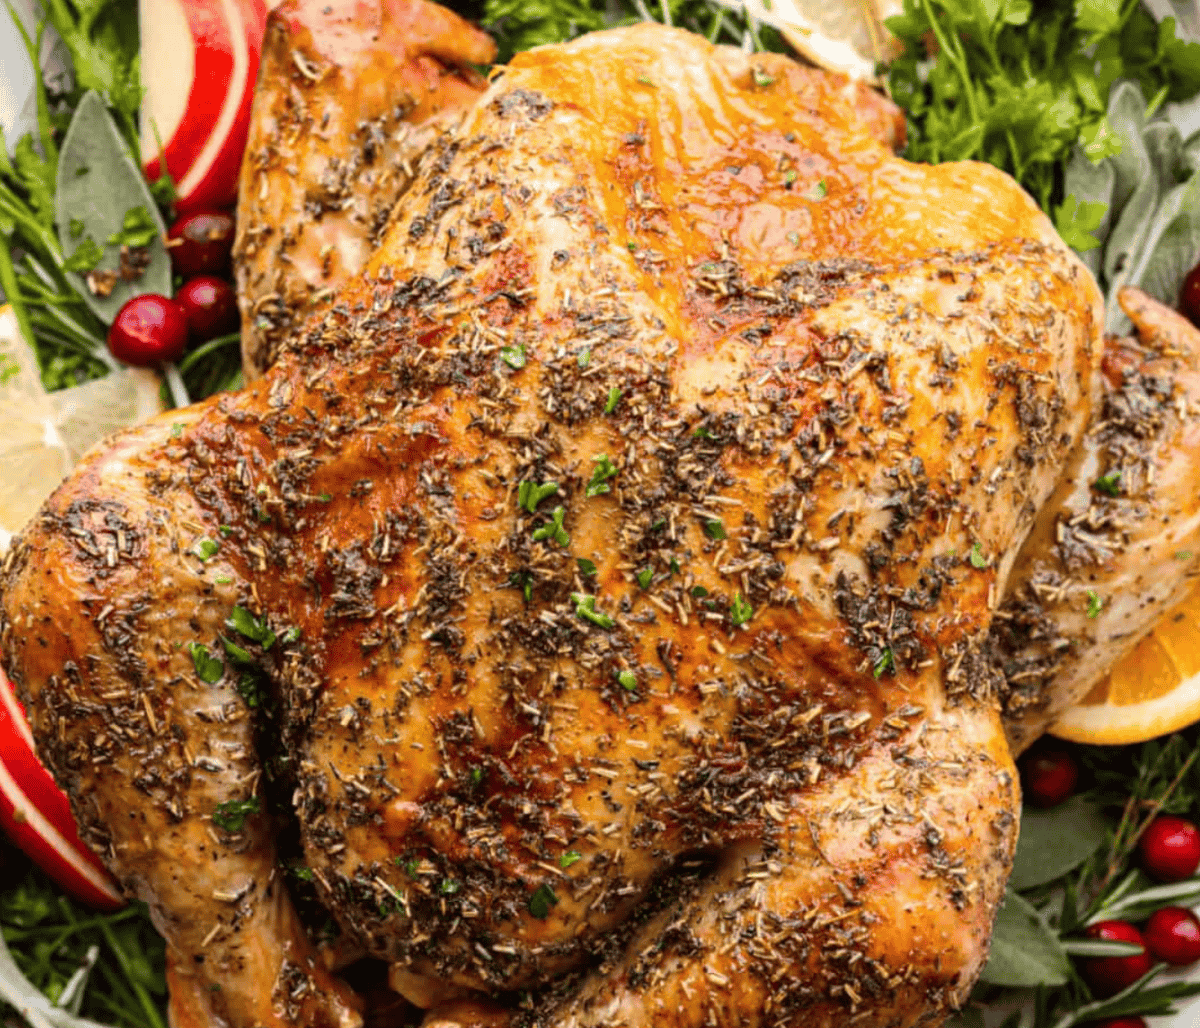
The Seasoned Butter Technique
This is arguably the most impactful trick for a flavorful, juicy turkey with golden-crisp skin. Prepare a generous amount of softened butter (about ½ cup for a 12-16 lb turkey) and mix it with your favorite seasonings — think finely minced herbs like sage, thyme, rosemary, along with salt, black pepper, garlic powder, and a pinch of paprika for color. The method is simple yet transformative:
- Gently separate the skin from the breast meat, starting from the cavity opening. Work your fingers carefully to create pockets without tearing the skin.
- Rub about two-thirds of the seasoned butter directly onto the breast meat, underneath the skin. This ensures the breast, which tends to dry out faster, stays moist and absorbs all that wonderful flavor.
- Spread the remaining seasoned butter all over the exterior of the turkey, including the legs and wings.
The butter under the skin melts, basting the meat from the inside out, while the butter on the surface helps achieve that beautiful, golden-brown crispiness.
Aromatics and Flavor Enhancers
To infuse even more flavor, consider stuffing the turkey cavity loosely with aromatics. Halved onions, apples, lemons, oranges, and fresh herbs (like thyme, rosemary, bay leaves) will release their fragrance and moisture into the bird as it roasts, adding depth without making the turkey taste like soup. Avoid dense stuffing inside the bird, as it can prolong cooking times and make it harder to reach safe internal temperatures.
To Brine or Not to Brine?
While the seasoned butter technique is highly effective for moisture, some cooks swear by brining. A wet brine (submerging in a salt water solution) or a dry brine (rubbing with salt and seasonings) can enhance moisture and flavor throughout the meat. However, if you're using the butter-under-the-skin method, brining might be an optional step, primarily if you enjoy the specific flavor profile brining imparts. For most home cooks, the butter trick offers excellent results with less fuss.
Mastering the Roast: Temperatures, Timings, and Thermometers
Once your turkey is prepped and seasoned, it’s time to roast. Consistency in temperature and careful monitoring are key to perfectly cooked meat.
Oven Temperature and Roasting Times
A common starting point for roasting a whole turkey is an oven temperature of 325°F (160°C). This allows for even cooking without over-browning the skin too quickly. Roasting times will vary significantly based on the turkey's weight and whether it's stuffed or unstuffed:
- Unstuffed Turkey: Allow approximately 13-15 minutes per pound.
- Stuffed Turkey: Allow approximately 15-18 minutes per pound. (Note: It's generally recommended to cook stuffing separately for food safety and even cooking.)
Keep in mind these are general guidelines. The true indicator of doneness is the internal temperature.
The Instant-Read Thermometer: Your Best Friend
This is, without a doubt, the most critical tool for success when learning how to cook turkey. Visual cues like skin color or the clarity of juices are unreliable. An instant-read thermometer takes the guesswork out and ensures your turkey is cooked safely and perfectly:
- Insert the thermometer into the thickest part of the thigh, avoiding the bone. The temperature should read 175-180°F (79-82°C).
- Insert the thermometer into the thickest part of the breast. The temperature should read 165°F (74°C).
Since breast meat cooks faster than thigh meat, aiming for these specific temperatures ensures both parts are perfectly done without drying out the breast. If the breast is done but the thigh isn't, you can often shield the breast with foil while the thighs continue to cook.
The Critical Resting Period
Once your turkey reaches the target temperatures, resist the urge to carve it immediately! Transfer the turkey to a carving board and tent it loosely with foil for at least 20-30 minutes, or even up to an hour for larger birds. This resting period is crucial:
- It allows the muscle fibers to relax, reabsorbing the juices that have migrated to the center of the bird during cooking.
- The internal temperature will also continue to rise slightly (carry-over cooking), ensuring uniform doneness.
Skipping this step will result in juices running out onto your carving board, leaving you with a drier turkey.
Crafting the Complete Feast: Gravy, Sides, and Savvy Leftovers
A perfect turkey is often the star, but a complete holiday meal involves much more. Thoughtful planning can make the entire process enjoyable.
The Ultimate Gravy from Pan Drippings
Don't let those flavorful pan drippings go to waste! After resting your turkey, pour the drippings into a fat separator. Skim off the fat, then use the remaining flavorful juices as the base for an incredible gravy. Whisk in flour or cornstarch, cook until thickened, and season to taste. If you encounter lumpy gravy, simply pass it through a fine-mesh sieve for a silky-smooth finish.
Beyond the Bird: Meal Planning and Leftovers
A true holiday survival guide helps you manage the entire meal. Consider making side dishes, stuffings, and even some desserts in advance to alleviate day-of stress. Think about oven and refrigerator space management — which dishes can be made ahead and simply reheated? What can cook alongside the turkey? The editors of Fine Cooking magazine famously compiled practical advice for such comprehensive meal planning, ensuring you enjoy the feast as much as your guests.
And when the feasting is done, the joy continues with creative uses for leftovers. From turkey sandwiches to comforting soups, pot pies, or even quesadillas, a well-cooked turkey provides endless possibilities for "Continuing the Feast." For a holistic approach to your holiday cooking, encompassing everything from planning to problem-solving, explore our guide to a Stress-Free Turkey: Your Complete Guide to a Delicious Holiday Feast.
Mastering how to cook turkey doesn't have to be daunting. By following these straightforward steps — from thoughtful selection and proper thawing to the transformative seasoned butter technique, precise temperature monitoring, and that crucial resting period — you are well on your way to roasting a perfect, juicy turkey with irresistibly crispy skin. Embrace the process, trust your thermometer, and prepare to impress your guests with a truly memorable holiday meal. Happy cooking!
